
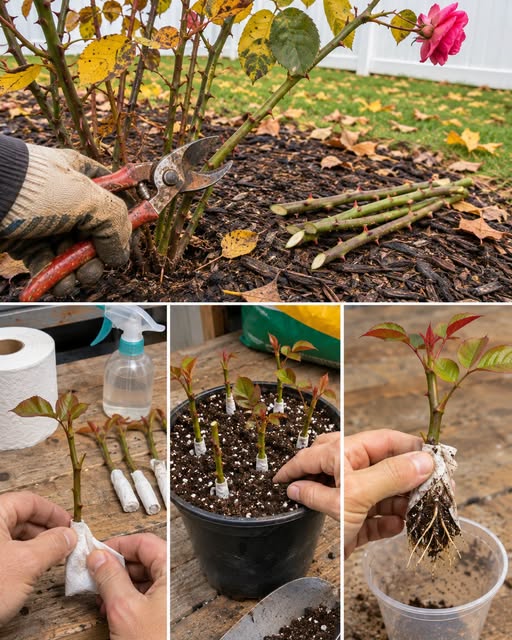
Step 4: Place the Cutting in a Plastic Bag
Carefully place the wrapped cutting inside a clear plastic ziplock bag. Leave the top of the bag slightly open or make a few small ventilation holes.
The goal is to maintain humidity without trapping excessive moisture. Place the bag somewhere bright but away from direct sunlight, which can overheat the cutting.
A warm location with indirect light is generally suitable.
Step 5: Check the Cutting Regularly
Inspect the cutting every few days. The toilet paper should remain lightly moist, not saturated.
If it begins to dry out, add a small amount of water. If you notice mold, a foul smell, or a soft, dark stem, remove the affected paper and inspect the cutting. Discard cuttings that have become rotten.
Root development can take several weeks, and the timing varies considerably depending on the rose variety and growing conditions.
Step 6: Check for Root Development
After a few weeks, carefully unwrap the paper to check the base of the cutting. Avoid pulling or rubbing the stem.
If you see small, healthy roots, the cutting may be ready for potting. If there are no roots, rewrap it gently and give it more time, provided the stem remains healthy.
Do not mistake new leaf growth for proof of rooting. A cutting can produce leaves using stored energy before it has developed roots.
Step 7: Plant the Rooted Cutting
Prepare a small pot with drainage holes and fill it with a moist, well-draining potting mix.
Make a hole in the center and gently place the rooted cutting inside. Cover the roots with soil and lightly firm the mix around the stem.
Water gently to settle the soil, allowing excess water to drain away.
Step 8: Help Your New Rose Adjust
Keep the newly potted cutting in a warm, sheltered place with bright indirect light. Avoid strong sunlight and drying winds while it adjusts.
Maintain lightly moist soil, but never leave the pot sitting in water. Gradually introduce the young rose to outdoor conditions once it is growing strongly and has developed a healthy root system.
Helpful Tips for Better Rooting Success
A few simple precautions can improve your chances of growing healthy rose cuttings:
- Use clean tools: Disinfect your shears before cutting to reduce the risk of spreading disease.
- Choose the right stem: Avoid very young, soft growth or old, woody stems.
- Keep the paper moist: Excess water can cause rot, while dry paper can allow the cutting to dehydrate.
- Avoid direct sunlight: Plastic bags can heat up quickly and damage the stems.
- Provide ventilation: A little airflow helps reduce mold.
- Be patient: Some rose varieties root more easily than others.
- Try several cuttings: Not every cutting will survive, so starting with a few increases your chances.
Common Mistakes to Avoid
Keeping the Toilet Paper Too Wet
Waterlogged paper can encourage fungal growth and stem rot. Always aim for lightly moist paper.
Using Unhealthy Stems
Cuttings from diseased, damaged, or weak branches are less likely to establish successfully. Choose healthy material from a vigorous plant.
Placing the Bag in Direct Sunlight
Direct sunlight can make the temperature inside a plastic bag rise quickly. Keep cuttings in bright, indirect light instead.
Planting Before Roots Develop
New leaves do not necessarily mean that roots have formed. Check the base gently before transferring the cutting to soil.
Forgetting to Check for Mold
A closed, humid environment can encourage mold. Inspect your cuttings regularly and remove damaged material.
Frequently Asked Questions
1. How long does it take for rose cuttings to grow roots?
Rooting time varies by variety and conditions. It may take several weeks or longer. Some cuttings may never develop roots, even when cared for properly.
2. Does toilet paper really help roses grow roots?
Toilet paper can help retain moisture around the cutting, but it does not stimulate root growth on its own. Healthy stems, suitable humidity, warmth, and good care are more important.
3. Do I need rooting hormone?
No. Rooting hormone is optional, although it may improve the chances of success for some rose varieties. Follow the product label if you decide to use it.
4. Can I propagate roses at any time of the year?
The best time depends on your climate and the type of cutting. Many gardeners have success with semi-hardwood cuttings during the growing season. Avoid taking cuttings during extreme heat or when the parent plant is stressed.
5. How often should I water rose cuttings?
Check the paper every few days and add water only when it begins to dry. After planting, keep the potting mix lightly moist without allowing it to become waterlogged.
6. Can I grow roses from store-bought cut flowers?
It is possible to experiment with cut flowers, but success is often low. Florist roses may be old, treated, or unsuitable for propagation. Fresh cuttings from a healthy living rose plant are generally a better choice.
7. When can I move my new rose into the garden?
Wait until the cutting has developed a healthy root system and shows stable new growth. Gradually acclimate it to outdoor conditions before planting it in its permanent location.
Final Thoughts
Propagating roses from cuttings using toilet paper is an inexpensive gardening experiment that may help you grow new rose plants from stems you already have. The method is simple: prepare healthy cuttings, wrap their bases in lightly damp toilet paper, maintain humidity, and check regularly for roots.
Remember that success is not guaranteed, and toilet paper is only a moisture-holding aid. With patience, clean tools, and the right growing conditions, you may be able to turn a small rose cutting into a beautiful new plant for your garden.
Give this method a try with several healthy cuttings, and enjoy the rewarding experience of growing your own roses!
